
Zustand란?
리액트 상태관리 라이브러리이다.
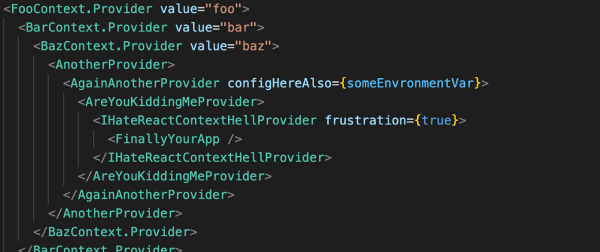
context 사용시의 중첩 Provider 지옥을 벗어날 수 있고 hook처럼 사용 가능하다. 코드가 매우 간결!
상태 변경시에만 컴포넌트를 렌더링하는 메모이제이션도 가능하다.
1. Zustand 설치 방법
npm install zustand # or yarn add zustand
2. Zustand 사용법
// store.js

// Devtool 연동 없이 store 생성 방법
import create from "zustand"; // create로 zustand를 불러옵니다.

const useBearStore = create((set) => ({
  bears: 0,
  increasePopulation: () => set((state) => ({ bears: state.bears + 1 })),
  removeAllBears: () => set({ bears: 0 }),
}));
export default useBearStore;
// App.js
import "./App.css";
import useBearStore from "./store.js";
function App() {
const bears = useBearStore((state) => state.bears);
const increasePopulation = useBearStore((state) => state.increasePopulation);
const removeAllBears = useBearStore((state) => state.removeAllBears);
return (
<>
<h1>{bears} around here ...</h1>
<button onClick={increasePopulation}>one up</button>
<button onClick={removeAllBears}>remove all</button>
</>
);
}
export default App;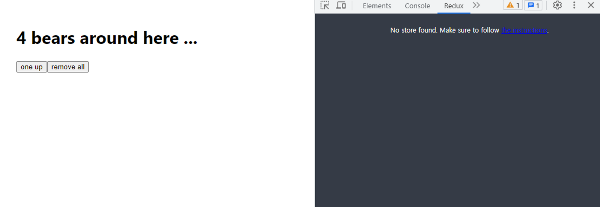
1개씩 카운트가 증가한다. 하지만 Redux 개발자 도구에는 전역 state가 확인이 되지 않는다.
Redux devtools 연동 방법
// store.js

import create from "zustand"; // create로 zustand를 불러옵니다.
import { devtools } from "zustand/middleware";

// const useBearStore = create((set) => ({
//   bears: 0,
//   increasePopulation: () => set((state) => ({ bears: state.bears + 1 })),
//   removeAllBears: () => set({ bears: 0 }),
// }));
// export default useBearStore;

const store = (set) => ({
  bears: 0,
  increasePopulation: () => set((state) => ({ bears: state.bears + 1 })),
  removeAllBears: () => set({ bears: 0 }),
});
const useBearStore = create(devtools(store));
export default useBearStore;
// App.js
import "./App.css";
import useBearStore from "./store.js";
function App() {
// const bears = useBearStore((state) => state.bears);
// const increasePopulation = useBearStore((state) => state.increasePopulation);
// const removeAllBears = useBearStore((state) => state.removeAllBears);
// 구조분해할당으로 꺼내오는 방법
const { bears, increasePopulation, removeAllBears } = useBearStore(
(state) => state
);
return (
<>
<div style={{ padding: "30px" }}>
<h1>{bears} bears around here ...</h1>
<button onClick={increasePopulation}>one up</button>
<button onClick={removeAllBears}>remove all</button>
</div>
</>
);
}
export default App;
리덕스 개발자툴과 연동 되어 상태관리 디버깅이 가능해졌다.
우리 회사의 경우 리액트 쿼리로 상태관리를 하기 때문에 Zustand의 경우 JWT/세션 기능에서 종종 사용 한다.
공식문서
https://github.com/pmndrs/zustand
GitHub - pmndrs/zustand: 🐻 Bear necessities for state management in React
🐻 Bear necessities for state management in React. Contribute to pmndrs/zustand development by creating an account on GitHub.
github.com
참고
https://www.rldnrl.dev/blog/zustand
Zustand 번역
Zustand를 번역한 글이다.
www.rldnrl.dev
https://blacklobster.tistory.com/3
개쉽다! Zustand 사용법 - React 상태관리 라이브러리
현재 리액트 상태관리 라이브러리는 참 많이 있습니다. 대표적인 Redux와 MobX, Recoil, Jotai, ... Redux가 상태관리 라이브러리의 시초격(Flux 패턴)이라 할 수 있는데요. 그렇기 때문에 많은 개발자들로
blacklobster.tistory.com
[react] 상!태!관!리! Zustand 를 아십니까?
정말 쉬운 리액트 전역상태관리! 프로젝트 한다고? 뭐 새로 배울 시간이 없다고? 무조건 사용해보자. zustand! 주토피아 아님
velog.io
'Study > 라이브러리' 카테고리의 다른 글
| [라이브러리] exceljs를 활용하여 JS데이터를 엑셀 파일로 추출해 보자. (0) | 2023.06.28 |
|---|---|
| [라이브러리] qs 모듈을 이해해 보자. (URL query string) (0) | 2023.06.26 |

